// Engineering Review //
The Smart
Water Box
Is the “classified” DIY water generator pure marketing fluff, or a sound mechanical reality? I bought it, built it, and tore it apart.
You’re here because you’ve seen the ads for the Smart Water Box. You know the promise: to generate clean, drinkable water from thin air using a DIY system based on “classified military tech,” potentially saving your family during a fire, drought, or grid-down scenario.
The ads are intense, emotional, and feature stories of neighborhoods burning while one house stands perfectly fine because it had its own endless water supply.
But you’re smart enough to know that most digital survival products are overhyped fluff wrapped in a scary story.
You aren’t looking for another prepper “fantasy” PDF. You want to know if the engineering is sound. If the instructions are clear. If you, with your average tool set and no engineering degree, can actually build a machine that pulls water out of the air.
I decided to buy it, log in, and tear it apart so you don’t have to guess. I’m not here to sell you a dream. I’m here to tell you if the system actually works, if the blueprints are worth the paper they’re printed on, and exactly what is waiting for you behind the paywall.
!
Spoiler Alert
It is legit, but it requires real work.
It is not a “push-button” miracle. It is a serious, 84-page engineering and assembly manual for a thermoelectric cooling project. It is not for everyone. But for the person it is for, it is an absolute goldmine.
Here is exactly what you get for your money:
01
The Authority Check: How the creator qualifies his authority to teach this build.
02
The Core Mechanics: A breakdown of the thermoelectric cooling science that powers the device.
03
Page-by-Page Breakdown: A look at the build process, parts list, and schematic clarity.
> System Boot. Let’s dig in.
// Threat Assessment & Verification //
The “BS Detector” Test:
Who is “James Anderson”?
The creator uses a pen name, “James Anderson.” In the world of digital products—especially those that deal with sensitive topics like “deep state” water conspiracies—this is not a red flag. It’s a strategic choice. He states explicitly that his goal is anonymity, citing threats and the mysterious disappearance of a colleague who shared this tech.
So, if his name isn’t real, how do we verify his authority? We look at the substance of what he provides.
The authority here doesn’t come from a name; it comes from the source material he claims to possess.
He claims his uncle, a Marine combat engineer, left him classified blueprints for an atmospheric water generator adapted from submarine and ISS recovery systems.
> Is this plausible? Let’s analyze the evidence:
Exhibit A
The Engineering Language
The PDF is not written by a weekend hobbyist. The first 14 pages are dedicated exclusively to Peltier theory, thermal dynamics, and design calculations.
It references specific scientific principles (Seebeck/Peltier effects), provides rigorous formulas for heat loss ($Q = \frac{A \cdot \Delta T \cdot K}{\Delta X}$), and includes a precise table of thermal conductivities for materials like Pure Copper (401 W/m-K) and Pure Aluminum (237 W/m-K).
This is not the language of a con artist; it’s the precise language of an engineer or someone who has direct access to industrial engineering documents.
Exhibit B
The Specificity of the Build
The manual doesn’t vaguely say “get a box and a fan.” It provides precise, measured diagrams for PVC pipes at exactly 320mm x Ø 125mm.
It dictates specific torque requirements for mounting the delicate Peltier modules (10 N-cm), and gives hands-on instructions—like sliding components back and forth 20 times to physically eliminate microscopic air pockets in the thermal paste.
This level of forensic detail suggests the plans were either created by or copied directly from a meticulous source, highly likely a prototyping or military environment.
Exhibit C
The Narrative vs. The Product
It’s crucial to separate the sales story from the product. The story is highly emotional and purposefully designed to sell. The product, however, is a hardcore technical document.
“James Anderson” didn’t write an ebook on “hope”; he delivered a technical schematic. He is not just a teacher; he is a translator of complex military/industrial documents into a format a DIYer can physically understand and execute. This matters immensely because the core value isn’t his charisma—it’s the structural integrity of the blueprints he decoded.
The fact that he includes rigorous health warnings, cautions about operating Peltier modules at 70% of max values to prevent catastrophic failure, and multiple mounting methods proves he is a practitioner who cares about the function, not just the sale.
// Final Verdict //
“James Anderson” may absolutely be a pseudonym, but the 84-page Smart Water Box manual proves he (or his source) possesses a deep, practical, and theoretical understanding of real-world thermoelectric engineering.
He isn’t a guru; he’s a highly capable conduit for a legitimate piece of hardware design.
// Security Clearance: Verified //
Breaching the Paywall:
Inside the Members Area
I promised to show you exactly what is waiting on the other side. No blind spots. Here is the unedited look at the Smart Water Box dashboard the moment your credentials clear.
Phase 1: The Dashboard Overview
Upon login, you aren’t hit with endless upsells or chaotic navigation. The layout is clean, direct, and utilitarian—exactly what you want when accessing technical schematics.

Phase 2: The Core Blueprints
This is the meat of the product. The primary download section houses the high-resolution manuals, parts lists, and assembly guides required to physically build the water generator.

Phase 3: The Tactical Bonuses
Often, digital “bonuses” are dead links or filler content. Here, they are fully accessible, organized, and designed to supplement your off-grid and survival capabilities beyond just the water generator.

The “Over-The-Shoulder”
Walkthrough
This is what you came for. I have the login. I have the PDF downloaded. I have read every single page, and I am going to walk you through it section by section.
This is not a summary; this is a forensic audit of the core product, the Smart Water Box guide.
The manual is divided into four logical parts, moving from theory to materials to assembly to wiring.
Part 1: Front Matter, Theory, and Engineering Guidelines (Pages 1-14)
This section is the “why” behind the “how.” It firmly establishes the scientific credibility of the project before you even touch a tool.
Pages 1 to 3: Intro & Disclaimer
[THE AGENDA]
The document opens with a standard title page and a detailed Table of Contents. It’s clean and organized, immediately signaling that this isn’t a slapdash eBook.
[THE GOLDEN NUGGET]
The critical health disclaimer on Page 3. Before any theory, the manual explicitly states you must boil the water before drinking. This is huge. It’s a safety-first approach that shows the creator isn’t trying to sell a “magic bullet” but a real mechanical system. It then launches into a brief but accurate history of the Peltier effect.
[THE APPLICATION]
You immediately understand the core technology. You aren’t building a filter; you are building a device that uses electricity to create a temperature differential, forcing condensation.
[CRITIQUE]
The theory is dense. A complete novice might feel overwhelmed here, but the manual is structured so you can skim this section and come back to it. It’s better to have it and not need it than to need it and not have it.
Pages 4 to 8: Peltier Theory & Calculations
[THE AGENDA]
This is the engineering core. It provides worked examples of how to calculate the cooling power needed for specific tasks.
[VIDEO 1 / PAGE 4]
Explicitly warns against running Peltier modules at Imax/Vmax, recommending 70% of maximum values to prevent efficiency loss from Joule heating. This is a pro-tip that extends the life of your build.
[VIDEO 2 / PAGES 5-6 : THE GOLDEN NUGGET]
Calculates the thermal requirements to cool a 10-liter insulated box. It factors in the thermal conductivity of urethane foam and adds a 25% safety margin. It teaches you the methodology of engineering, not just to copy a single build.
[VIDEO 3 / PAGES 7-8]
Walks you through the specific heat capacity of water math to cool 5 liters from 20°C to 10°C in one hour, concluding you’d need five specific Peltier units. Shows the scalability of the concept.
[THE APPLICATION]
If you want to modify the design, build a larger unit, or understand why the parts list is what it is, these pages are indispensable.
[CRITIQUE]
The math is real. You will need a calculator and maybe a cup of coffee to get through formulas like $Q = (A \cdot \Delta T \cdot K) / (\Delta X)$, but it’s highly accurate and applicable.
Pages 8 to 11: Mounting Methods & Cautions
[THE AGENDA]
The physical assembly of the delicate thermoelectric units.
[THE GOLDEN NUGGET]
The 12-step mounting method. It’s not just “slap on some thermal paste.” It dictates cleaning with alcohol, applying a thin layer of silicon grease, sliding the components 20 times to eliminate air pockets, using washers/liquid thread lock, and tightening to a specific torque of 10 N-cm. This detail prevents the most common point of failure in DIY thermoelectric projects: poor thermal interface and moisture damage.
[THE APPLICATION]
Follow these steps to the letter, and your Peltier modules will transfer heat efficiently for years. Skip them, and your “Smart Water Box” will be a paperweight in a month.
[CRITIQUE]
The torque specification (10 N-cm) assumes you have a torque screwdriver. Most DIYers don’t. The instruction to apply 200-300 N of axial tension is a guideline based on feel. While the intention is excellent, execution relies heavily on user experience.
Pages 12 to 14: Heat Transfer & Tool List
[THE AGENDA]
A reference page for thermal dynamics and a visual list of required tools.
[THE GOLDEN NUGGET]
The table of thermal conductivities is a fantastic reference. It scientifically explains why copper is used for the condenser coil (401 W/m-K) versus aluminum for the radiators (237 W/m-K)—a perfect balance of cost and mechanical performance.
[THE APPLICATION]
You use this list to gather your physical tools: knife, saw, drill, angle grinder, heat gun, etc. No surprises halfway through the build.
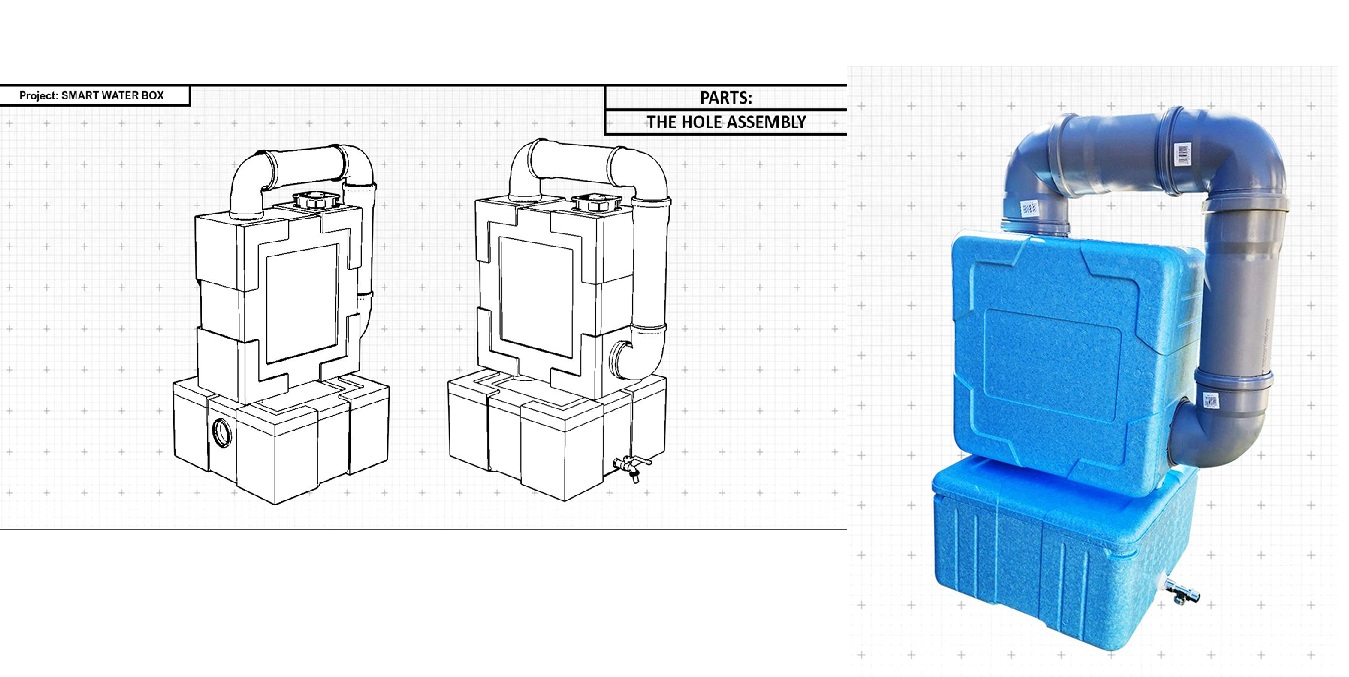
Part 2: The Materials Master List (Pages 15-49)
If Part 1 was the engineering brain, Part 2 is the exact shopping list. And this is where the Smart Water Box manual makes its first massive stride toward real-world credibility.
The creator has done something surprisingly user-friendly: every single component is shown twice—once in metric measurements and again in imperial inches. This meticulous attention to detail ensures that whether you’re in a hardware store in Nebraska or a market in Mumbai, you can find the right parts.
// Initiate Inventory Breakdown //
Pages 15-18 (Sheets 01-02):
The PVC Framework
[THE SPECS]
Four pieces of PVC Pipe at 320 mm x Ø 125 mm (12 5/8″ x Ø 4 7/8″) and two longer pieces at 1000 mm x Ø 125 mm (39 3/8″ x Ø 4 7/8″).
[THE GOLDEN NUGGET]
The specific diameter (125mm or roughly 4.8 inches) is critical. It’s large enough to house the internal radiator assembly but common enough to find at any major hardware retailer. The creator didn’t choose an obscure, custom size.
[THE APPLICATION]
This forms the vertical “water-making column” and the external ducting. You’re essentially building a PVC skeleton.
Pages 19-26 (Sheets 03-06):
Connectors and Housing
[THE SPECS]
Four 87° PVC Elbow Pipes, one PVC T-Pipe, one PVC Cover Pipe, and two large square Thermo Boxes (595 mm x 595 mm x 257 mm).
[THE GOLDEN NUGGET]
The “Thermo Boxes” are the key here. The manual specifies a square, insulated container. In practice, this acts as the cold reservoir (bottom box) and the hot/ambient mixing chamber (top box). Their insulation properties are vital for thermal efficiency.
[THE APPLICATION]
The T-Pipe connects the bottom reservoir to the external world, while the elbows will effectively route the airflow in a specific U-shaped path.
Pages 27-30 (Sheets 07-08):
The Heat Exchange Loop
[THE SPECS]
One roll of Copper Pipe (3000 mm long x 2.5 mm diameter) and one Transparent Hose (1000 mm long x 3 mm diameter).
[THE GOLDEN NUGGET]
The copper pipe is the heart of the condenser. 3 meters of narrow copper tubing provides the exact surface area necessary for the humid air to rapidly cool and condense into liquid water. The transparent hose is for the closed-loop coolant system.
[THE APPLICATION]
You will be manually coiling this copper pipe around the PVC assembly. It requires focus and patience.
Pages 31-36 (Sheets 09-11):
The Thermoelectric Core
[THE SPECS]
Two Cooler Blocks (liquid line nozzles), two Peltier Modules (40 mm x 40 mm x 3.4 mm), and two heavily finned Cooling Radiators (65 mm x 65 mm x 25 mm).
[THE GOLDEN NUGGET]
This is the “engine.” The Peltier modules create the cold. The Cooler Blocks transfer that cold to the liquid loop. The finned Radiators aggressively dissipate the immense heat generated on the hot side of the Peltiers. The manual is explicit: you need two of each.
[THE APPLICATION]
These components are precisely sandwiched together with thermal paste to create a solid-state heat pump.
Pages 37-48 (Sheets 12-17):
Electronics & Dispensing
[THE SPECS]
Water Faucet, 80 mm electronic Fan, small Air Pump, Cable Connector block, Self-Tapping Screws, and electrical Cables.
[THE GOLDEN NUGGET]
The Air Pump is a crucial differentiator. This isn’t a passive system. The pump actively circulates the coolant (water or air) through the copper coil, drastically maximizing thermal transfer.
[THE APPLICATION]
The faucet provides the final interface for collecting your water. The fan aggressively exhausts the hot air from the top box.
Page 49 (Sheet 18):
The Consumables
[THE SPECS]
Water-resistant silicone sealant, thermal compound paste, aluminum tape, plastic zip ties.
[THE GOLDEN NUGGET]
The manual doesn’t forget the “glue.” It specifically calls for water-resistant silicone, which is absolutely essential for a device handling constant condensation and liquid water.
[THE APPLICATION]
You will use silicone on every joint, penetration, and seal to prevent catastrophic leaks and protect the sensitive electronics from ambient humidity.
Critique of the Materials List & Cost
The manual assumes you have access to a local hardware store or a supply of scrap materials. While the parts are common, the total out-of-pocket cost will vary wildly.
The creator claims it can be built for around $106, which is totally plausible if you salvage the fans, pumps, and some piping from old electronics. However, buying everything brand new might push the cost closer to $150-$200. The manual is highly transparent about the parts required, but not about the potential price fluctuation based on your local market conditions.
Part 3: Step-by-Step Building Process (Pages 50-81)
This is the “execution” phase. The manual transitions from text and lists into clean, isometric diagrams. There are 32 distinct steps, and following them in exact order is completely non-negotiable.
// Commencing Forensic Breakdown //
Phase 1: Preparing the Lower Reservoir
[STEPS 01-03]
You start by taking one Thermo Box and cutting two holes: one small, low hole for the faucet, and one large side hole for the T-Pipe. You then tightly install the faucet.
[STEPS 04-06]
You insert the PVC T-Pipe so its horizontal branch sticks out the side hole. You then meticulously seal everything—the faucet base, the pipe penetration—with generous amounts of water-resistant silicone.
[THE GOLDEN NUGGET]
Step 06 explicitly calls this a “quality-control check.” The manual knows that if this box leaks, you have a useless puddle, not a water supply. The strict emphasis on sealing here is the difference between total success and structural failure.
Phase 2: Building the “Water Making Module”
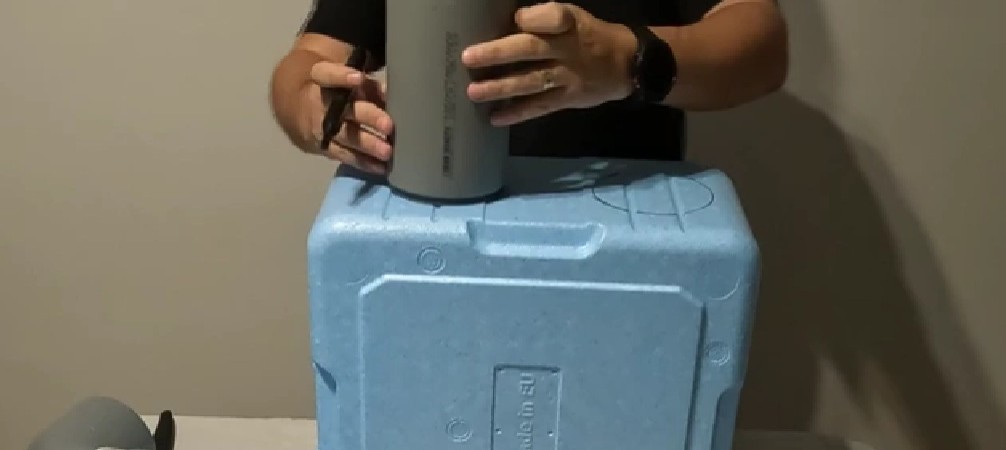
[STEPS 07-08]
You take the second Thermo Box and expertly cut three large holes: one in the side and two in what will eventually become the top.
[STEPS 09-11]
This is where the engineering gets real. You take the 1000 mm PVC pipe and cut a rectangular window completely through both sides. You then insert the two finned Cooling Radiators so they are exposed through these cutouts, and screw them firmly in place. This precise configuration creates a crossflow heat exchanger.
[STEPS 12-14]
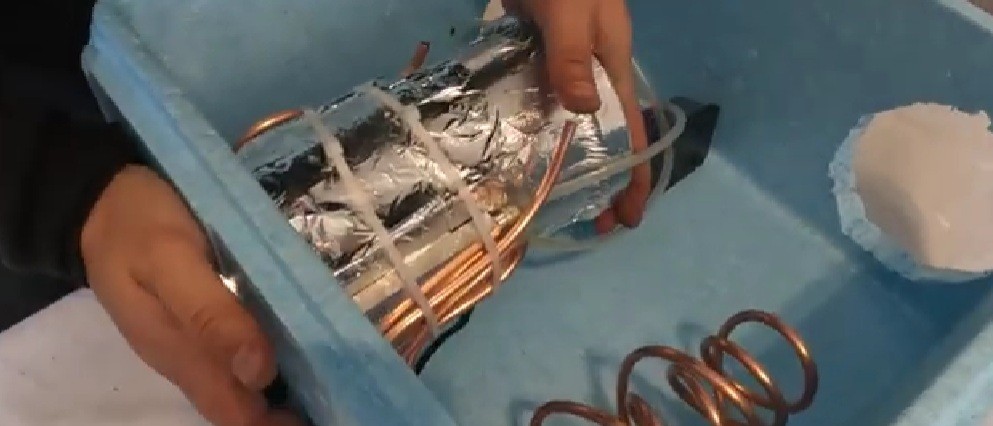
The core assembly. You apply thermal paste to the Peltier Modules and sandwich them between the exposed face of the Radiators (inside the pipe) and the Cooler Blocks (outside the pipe). Then comes the most intricate step: Step 14. You must carefully uncoil the 3-meter copper pipe and wrap it tightly around the exterior of the PVC pipe and the Cooler Blocks.
[THE GOLDEN NUGGET]
This copper wrap serves dual purposes. It acts as a highly efficient pre-cooler for incoming air, and its direct contact with the Cooler Blocks allows it to become a secondary cold radiator. This specific design aggressively maximizes the surface area available for condensation.
Phase 3: Sealing & Airflow Management
[STEPS 15-16]
You insert this completed “Water Making Module” vertically into the upper Thermo Box. You then heavily insulate the internal pipe structure with silicone and aluminum foil to prevent thermal bleed.
[STEPS 17-19]
You rigidly mount the Air Pump inside the upper box and painstakingly route the transparent hose to connect the pump, the copper pipe, and the Cooler Blocks. This creates a highly efficient closed-loop system that circulates the cooling medium.
[STEPS 20-24]
You seal the upper box, firmly mount the 80 mm fan onto the top hole (to actively exhaust hot air), and attach an elbow pipe to perfectly direct the airflow.
Phase 4: Mating the System
[STEPS 25-29]
You build the external PVC ductwork. This seamlessly connects the top box’s exhaust to a vertical downpipe, which then strategically elbows back toward the bottom box.
[STEPS 30-32]
The final physical steps. You carefully stack the upper box directly onto the lower box, perfectly aligning the ductwork. Step 32 reveals a satisfying, full-color photograph of the completed, real-world Smart Water Box.
[THE GOLDEN NUGGET]
The external ductwork is a brilliant piece of passive engineering. It intelligently uses the fan’s exhaust pressure and the natural convection of the system to create a slight vacuum or airflow pathway that actively aids in drawing humid air into the intake and depositing condensed water safely into the bottom tank.
Part 4: Wiring and Conclusion (Pages 82-84)
The final technical hurdle is the electrical system. You have a completely assembled mechanical unit; now you must breathe life into it.
The wiring diagram is elegantly simple. It shows the three powered components: the Air Pump, the two Peltier Modules, and the Fan. The diagram instructs you to wire all the red (positive) wires together and all the black (negative) wires together into the single cable connector block.
[THE GOLDEN NUGGET]
This creates a parallel circuit. This is the correct way to wire a 12V system like this. It ensures that each component receives the full, unmitigated voltage of your power source. If you wired them in series, they would divide the voltage and likely stall out. Applying a single DC power source to the connector block drives the entire ecosystem simultaneously.
[PAGE 84: SYSTEM SHUTDOWN]
The manual ends with a polite “End Note,” thanking the user and asking for photos of the completed project. It’s a remarkably humble end to an intensely technical document.
// Pre-Flight Requirements //
The Tech Stack & Tools Required
Buying the guide is step one. Actually building the Smart Water Box requires a modest but highly specific set of tools and materials.
[01] Physical Hardware
Cutting Tools:
Knife, Saw, Cutter, and an Angle Grinder (essential for cutting the dense PVC and the Thermo Box holes cleanly).
Assembly Tools:
Drill with specialized bits, Tape Measure, Marker, standard Screwdrivers.
Sealing Tools:
Silicone Gun, Heat Gun (used for forming PVC or rapidly curing watertight seals).
Precision Tools:
A Torque screwdriver (ideal for the delicate Peltier mounting, though not strictly mandatory if you have a calibrated feel for “snug but not crushing”).
[02] Ongoing Infrastructure
Power Source:
The unit runs strictly on DC power. The creator’s grid-down scenario implies a need for a battery bank (e.g., a deep-cycle marine battery) and a solar panel to charge it. For home use, a standard AC-to-DC power supply works, but ties you to the grid.
Water Storage:
The bottom Thermo Box acts as a primary reservoir, but depending on your output, you may want to connect it directly to a larger food-grade storage tank.
Water Purification:
The manual explicitly states you must boil the water. This requires a heat source (propane, wood, solar cooker). Alternatively, invest in a high-quality gravity-fed filter (like a Berkey) to bypass boiling.
How the Smart Water Box Minimizes Costs
The guide purposefully provides templates and measurements so you don’t need expensive pre-fabricated parts. By using standard PVC and generic Thermo Boxes, you completely bypass the “proprietary markup” of commercial AWG (Atmospheric Water Generator) units, which regularly cost thousands of dollars.
// Asset Verification //
The “Hidden” Bonus Suite
(Valuation Audit)
When you purchase the Smart Water Box, you gain access to a members area containing not just the main manual, but a collection of additional guides. Let’s audit their actual, real-world value.
Bonus 1: SunHeat DIY
What it is: A guide to building solar-powered water heating panels from scratch, using scavenged materials like empty plastic bottles.
My Take: This is surprisingly valuable. It complements the main product perfectly. The Smart Water Box gives you any water; SunHeat gives you hot water without grid power. The design is scalable and genuinely useful for off-grid living. It’s not just PLR fluff; it’s a real, functional blueprint.
Bonus 2: Home DIY Secrets
What it is: A collection of home repair and efficiency “hacks,” covering insulation, contractor rip-offs, and making your own cleaning products.
My Take: This is more of a traditional “bonus pack.” The information is good, practical advice, but it’s the kind of stuff you could find scattered across YouTube or blogs. It’s a useful addition, but it’s not as tightly integrated with the core survival theme as SunHeat.
Bonus 3: The Mini-Guides Bundle
What it is: A bundle of short, topic-specific PDF guides (I Can Fix It, Roof Cleaner, Money Saving Tips, The Art of Woodworking, etc.).
My Take: This is a mixed bag. Some are genuine skill-building resources. Others are more generic. They add to the overall perception of value, but they aren’t the “crown jewels” of this package.
The Real MVP
The Smart Water Box Video
What it is: In the members area, you’ll also find a full video walkthrough of the build. It physically shows the creator handling the parts and assembling key sections.
My Take: This is arguably more valuable than all the text bonuses combined. Seeing the 3-meter copper pipe being coiled, or exactly how the radiators fit into the PVC cutouts, immediately removes the ambiguity of 2D diagrams. It significantly reduces the learning curve.
[ Total Value Calculation ]
The main 84-page manual alone is worth the price of entry. The SunHeat guide is a solid second product. The video walkthrough is the instructor holding your hand. Mathematically, the bundle is an absolute no-brainer compared to buying a commercial AWG unit.
Target Assessment
Who Should NOT Buy This?
I’m going to be aggressive here to save your time. The Smart Water Box is a specialized tool for a specific individual. It is not a universal solution.
Abort if: You want a “push-button” fix.
If you expect to unbox it and plug it in, go buy a commercial AWG for $3,000. This is a DIY project involving cutting, gluing, and wiring.
Abort if: You have zero DIY experience.
The manual assumes you can safely operate a saw and a drill. If cutting plastic makes you anxious, this will completely overwhelm you.
Abort if: You expect “infinite free water.”
It requires electricity to run. In a grid-down scenario, you will absolutely need a solar panel and battery bank to power the cooling modules.
Abort if: You need a same-day crisis fix.
If your tap is dry today, this won’t save you. Building it takes a weekend at minimum. It is a preparedness tool.
Abort if: You are a master plumber.
If you can engineer a thermoelectric cooler from scratch, skip this. This is for hobbyists who want a proven roadmap to avoid the guesswork.
PROCEED ONLY IF:
You are ready to physically build. You understand the value is the blueprint. You are paying for the engineering so you don’t have to figure it out yourself.
Pricing, Refunds &
The “Loophole”
The Entry Price: $39
A one-time payment secures the guide, video walkthrough, and bonus suite. That’s less than a trip to the hardware store, making it a highly accessible entry-level price for a technical digital product.
The 60-Day Guarantee
You have two full months to download the files and attempt the build. If the wiring diagram overwhelms you, or you simply change your mind, you can request a full, no-questions-asked refund.
The “Loophole” (Risk Reversal)
You can test drive the system for 60 days. Because it’s a digital download, you could theoretically rip all the PDFs and immediately request a refund.
But if you do that, you’re stealing from the creator. The guarantee exists for your peace of mind, not to get free files. If it works, support the engineering. If not, get your money back. The financial risk is 100% on them.
Transparency: The Upsells
After your initial purchase, you will see optional upsells for related survival products. This is standard digital marketing. The core Smart Water Box guide is completely standalone. You can safely skip the upsells and access your blueprints immediately.
// Interrogation Protocol //
Extensive FAQ
(The Objection Killer)
I’ve compiled the most common questions a skeptical buyer would have. Here are the hard-hitting, unfiltered answers.
01
Is the Smart Water Box legit?
Yes. The Smart Water Box is a legitimate 84-page engineering and assembly manual for a thermoelectric cooler/water generator. It provides real theory, real parts lists, and real step-by-step diagrams. It is not a scam; it is a genuine DIY blueprint.
02
Is it a scam or a savior?
It’s neither. It’s a tool. It’s a savior if you are a DIYer who wants water independence and follows the instructions. It would be a scam if the creator promised a finished machine for $39. He doesn’t. He promises a plan, and he delivers a highly detailed one.
03
Is this saturated in 2025?
The concept of atmospheric water generation isn’t new. But the specific military-derived design in the Smart Water Box is unique to this guide. The market for DIY, off-grid water solutions is only growing as droughts and grid instability worsen. You aren’t competing with anyone; you’re building a solution for your own home.
04
How much time per day do I actually need (Be honest)?
Be honest: You need a solid weekend. This is not a 20-minute project. You’ll need 4-6 hours to gather all the materials (unless you have them already), and another 6-8 hours across two days for the cutting, assembly, and sealing. The payoff is a lifetime of water production, but the build is a commitment.
05
What is the difference between this and a commercial AWG?
A commercial unit like a “WaterGen” or “EcoloBlue” costs $1,500-$3,000, comes pre-assembled, and plugs into the wall. The Smart Water Box costs you $39 for the plan and ~$100-$200 in parts. It requires assembly and a DC power source. One is for convenience; the other is for resilience, learning, and true off-grid independence.
06
Can I really build this if I’m not an engineer?
Yes. The manual is written for the motivated amateur. It explains the “why” in the theory section, but the build section is purely visual. If you can follow a Lego instruction booklet, use a drill, and cut a straight line, you can build this. The video walkthrough is the safety net for the tricky parts.
07
Are there hidden upsells after I join?
There is a standard post-purchase offer, but it is clearly presented as an additional option. You do not need to buy it to get the full Smart Water Box experience. Your $39 grants you immediate access to the main guide and all bonuses.
08
Does it work in dry climates?
This is the most important technical question. Peltier-based atmospheric water generators work best in relative humidity above 45%. They will produce water in drier climates, but the yield will be lower.
The manual’s engineering section helps you understand this. The creator’s story takes place in California, which has varying humidity. It will work, but if you live in a desert with 10% humidity, your output will be significantly less than 40 gallons a day.
09
What is the refund policy?
You have a full 60 days to request your money back. No questions asked. This eliminates all financial risk.
10
How much does it cost to build?
The creator estimates $106. Based on current hardware store prices, you should budget between $100 and $200, depending on what you have in your garage (old computer fans, scrap wire) and the cost of the Thermo Boxes and Peltier modules in your region.
11
Does it require a lot of electricity?
A single Peltier module can draw 5-6 amps at 12V. You are running two of them, plus a fan and a pump. This is a significant load.
If running on a battery, you’ll need a decent capacity (like a 100Ah deep-cycle battery) and a way to recharge it (solar). It’s not for running off a tiny phone charger.
12
Is the water really “pure”?
The water is distilled water, created by condensation. It will be free of the solids and contaminants found in ground or surface water. However, the manual explicitly states you must boil it before drinking to ensure any airborne pathogens or bacteria that condensed into the water are killed. This is a safety-critical step.
13
What happens if a part breaks?
Because you built it from standard parts, you fix it yourself. If a fan fails, you buy a new computer fan. If a Peltier module burns out, you order a replacement (they are cheap and widely available). You are your own warranty department, which is the ultimate form of self-reliance.
14
Can I scale this to produce more water?
Yes. The engineering section (Pages 4-8) literally teaches you how to calculate the cooling requirements for larger volumes. You could theoretically build multiple units or design a larger system with more Peltier modules.
15
Is this legal to build and own?
Absolutely. You are building a personal appliance. There are no laws against owning a dehumidifier or a thermoelectric cooler. The “classified” nature of the source material refers to the specific military application and efficiency designs, not the underlying physics, which is public knowledge.
16
What is the warranty on the digital product?
There is no explicit warranty on the files, but the 60-day money-back guarantee acts as one. If the files are corrupted or you can’t download them, customer support will help you. If you’re just unhappy, you get a refund.
17
Do I need planning permission or a license?
No. You are building a box in your garage. No permits are required for a DIY project of this scale.
18
Can I take this apart and move it?
Yes. The entire assembly is modular. You can disconnect the boxes, drain the lines, and transport it. It’s not fragile, but you’ll want to protect the Peltier sandwich from hard shocks.
19
What if I don’t have the tools listed?
The tool list (Pages 13-14) is essential. You will need to buy or borrow them. Harbor Freight or a local tool library are your friends. Factor the cost of a cheap drill or angle grinder into your budget if you don’t own them.
20
How long will the Peltier modules last?
If you follow the mounting instructions perfectly (thermal paste, correct torque, sealed from humidity), they can last for years. They are solid-state devices with no moving parts, so their lifespan is primarily determined by heat cycling and moisture intrusion. The manual’s emphasis on sealing with silicone is specifically to address the moisture risk.
// Final Operational Assessment //
Final Verdict:
Scam or Savior?
After spending hours inside the members area, mechanically dissecting the 84-page manual, and forensically auditing the bonus content, I can give you a crystal clear verdict.
[+] System Assets (Pros)
Incredibly Detailed
The engineering theory, parts lists, and step-by-step diagrams are forensic in their precision.
Legitimate Science
Firmly based on real Peltier effects and thermodynamic principles, not pseudo-scientific magic.
Scalable & Repairable
You completely own the design. You can easily fix or upgrade any part with standard, off-the-shelf components.
Risk-Free Trial
The ironclad 60-day money-back guarantee completely removes the financial downside of attempting the build.
Exceptional Value
For a mere $39, you get a masterclass in DIY thermoelectric engineering and a highly functional blueprint.
[-] System Liabilities (Cons)
Requires DIY Skill
This is absolutely not for the completely tool-illiterate. It demands focus, exact measurements, and physical effort.
Operating Costs
Requires a substantial DC power source, implying a hard need for batteries and solar setups if going fully off-grid.
Climate Dependent
Water output varies wildly based on relative humidity. It is not a “set and forget” solution for all extreme desert environments.
Post-Purchase Upsell
You have to navigate a standard digital sales funnel to get to your core content.
Water Requires Boiling
The raw output isn’t instantly potable without a critical, secondary purification step to kill airborne pathogens.
The Final Conclusion
The Smart Water Box is not a scam.
It is a dense, highly technical, and completely functional DIY blueprint. The creator, “James Anderson,” has successfully translated what appears to be a legitimate industrial engineering document into a format that a dedicated hobbyist or prepper can execute.
Is it a “savior”? That depends entirely on you. If you are sitting on the fence, here is the harsh reality: You can keep trying to figure this out on your own, scouring YouTube and prepper forums for inconsistent advice, wasting time and money on trial-and-error parts, and potentially building a unit that fails in six months due to poor thermal sealing. You could waste 6 months and $200 on failed experiments.
Or, you can buy the Smart Water Box today for $39, have the complete roadmap, the engineering rationale, and the video walkthrough, and systematically build a functioning, durable water generator in a single weekend.
The choice is between guessing and knowing. Between grid dependency and a tangible, mechanical step toward water freedom.
[ TIME-SENSITIVE INTEL ]
The current bonus stack, particularly the SunHeat DIY guide and the high-res video walkthrough, adds massive value, but these bonuses are subject to change and might disappear. The server access for this specific bundle could close at any time.
If you are serious about securing a source of clean water that doesn’t rely on the grid, municipal pipelines, or expensive store-bought filters, this is your blueprint.
How Useful Was This Post?
Click on a star to rate it!
Average rating 5 / 5. Vote count: 1